Did you know that although most teachers believe in the theory of different learning styles, there is no evidence for it? Rather, studies show we learn best using as many senses as possible! Today I’m excited to share this guest blog post about “Multisensory Teaching Approaches For Adaptive Riding” by Esther Schlegel. Esther is an Occupational Therapist (OT) from Germany who: has her own OT practice that includes Adaptive Riding and Hippotherapy, teaches college, and offers clinics, consultations and webinars (more in her bio at the end)! Her heart for what she does is evident and I’m happy to collaborate with her on this blog post – and, coming up soon, a review of one of her webinars. Without further ado, enjoy!
Multisensory Teaching Approaches For Adaptive Riding

What kind of learner are you? Maybe a visual learner since you are reading this blog? I remember taking different tests throughout my school life, which promised to determine my learning style and help to comprehend the information more efficiently. I´m sure that you have gotten in touch with the theory of the visual, auditory and kinesthetic learners at some point too. Some resources list more than 70 different learning style tests. One of most common ones is the VARK questionnaire that Neil Flemming created in the early 90´s. The content is internationally accepted, as a research project in 2014 revealed that 90% of teachers in various countries believe in these learning styles (O.Kazan, 2018). To create a learning atmosphere that is tailored to the needs of the individual student requires a dedicated teacher and deserves our respect; however, until today there is no evidence for the learning style theory. As a matter of fact, a high number of studies revealed that we are not a certain kind of learner and that we can comprehend new information best if it involves as many senses as possible (Max-Planck Institute, Gemany). In conclusion: a multisensory teaching approach seems to be the key to maximize our riders’ potential.
How can we use this information as Adaptive Riding Instructors?
Should we be talking about the correct riding position while showing pictures and moving the rider´s extremities all at the same time to achieve a proper posture while our student is astride the horse? Incorporating a multisensory teaching approach in our Adaptive Riding Lesson can help our rider to maximize their potential, but we still need to make sure that we are not creating a sensory overload. I´m sure this sounds pretty vague – to get a better idea of what the use of a multisensory teaching approach in Adaptive Riding can look like, let me introduce our rider Joy.
Let´s teach Joy a horsemanship and a riding skill incorporating a multisensory teaching approach!
Joy is a 7- year girl with Down Syndrome, who is very excited to learn all about horses. She just started the Adaptive Riding program a few weeks ago, decided that the day at the barn is her favourite day of the week and is familiar with safety aspects when handling horses. As independence is very important to Joy, two of the long-term goals she defined during her initial assessment were to learn how to groom a horse and how to ride a horse herself. Although Joy is very eager to learn new things, it can sometimes be a challenge for her to stay focused on a certain task.
Getting our horse groomed
To help Joy reach her goal of learning how to groom a horse I am choosing an area that is safe for anyone involved, doesn´t offer a lot of distraction through other people or animals and only contains the items needed for the task. I am also adjusting the grooming routine to Joy´s attention span by reducing the grooming items and choosing a 10 Minute time frame for the task. Since this would not be an adequate time to prepare a horse for a lesson, I ensure that the horse is properly groomed before Joy´s arrival. As Joy progresses, I will elongate the time frame and add more items to the routine.
Using a multisensory teaching approach, I am incorporating the following supportive items and strategies to help Joy learn how to groom a horse before she starts her riding lesson.
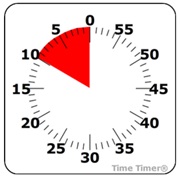
To provide Joy with an overview of how long we will be grooming our horse, I am using a Time-Timer in a safe spot where it can be viewed at all times. This tool provides an overview of the duration of the task. Joy can look at it whenever she needs to know “How long before I get to ride?” and I can use it to show her how much time she has spent grooming and how much time we have left. A great alternative to buying a Time-Timer is downloading an app such as “Kids Timer”. The time can be set manually and your rider can check “How much of the red is left”.
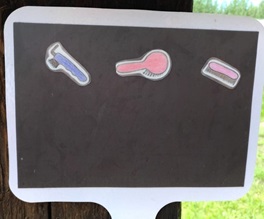
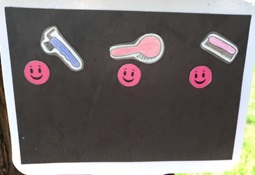
Another tool I am using is a visual schedule to help Joy learn the grooming routine and involve her by checking off the tasks she completed. There are a lot of different ways to create a visual schedule. For this specific rider I made a magnetic board. It allows me to add new item to the routine as Joy progresses in her skills. So far our visual schedule for grooming includes the hoofpick, the mane comb and the body brush.
Whenever Joy has completed a task, she checks it off by put a smiley face on the board underneath the specific grooming tool.
During the grooming procedure I use a combination of auditory, visual and tactile input and ask questions to help Joy relate to the horse. One example would be to link the personal experience of having a rock in our boots to the horse. This experience can help relate to the horse´s well-being and to remembering that picking out the hooves should be the first thing in our grooming routine.
To support Joy in her performance of how to use the specific grooming tools I show her how I hold the tool, move it and then let her use it while I keep my hand on her hand (if accepted by the rider) to give her an idea of the movement and the pressure that can be applied. This hand over hand support combined with clear and short verbal instructions can help the rider to reach a level of independence quicker than just explaining or just showing. After guiding Joy’s hand for a few movements I start fading out my instructions, removing my hand and letting Joy use the tool while ensuring that she is in a safe position.
Now that Joy has completed the grooming procedure, she is ready to ride!
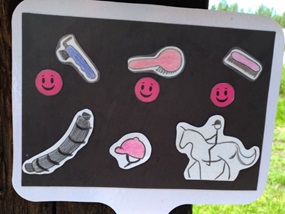
Joy is ready to ride!
As mentioned earlier, one of Joy´s long-term goals is to ride a horse independently. In her first few lessons she has learned that we as equestrians use certain aids to let our horse know what we would like them to do. Joy knows how to pick up her rainbow-reins and how to hold them properly. Today I will introduce her to walk – halt transitions. Joy is working together with a leader and a sidewalker.
The arena we work in provides the visual support of the arena letters combined with pictures, for example, the letter A is supported by the picture of an apple.
Before letting Joy use the reins, I clip them to the halter to ensure the well-being of the horse until Joy´s motor performance is well coordinated and refined. To explain Joy how to use her reins when performing downward transitions from the walk to the halt I start out by mentioning the goals she had set during her initial assessment and reviewing what she learned last week.
I am introducing Joy to this new task at the halt using a tactile hand over hand approach while explaining the movement and additionally relating the movement to a body part. (“Gently pull the reins towards your belly button.”) To determine if referring to body parts can be helpful when teaching Joy, I have assessed her knowledge during our initial assessment. Joy is a “body part expert” which encouraged me to refer to her belly button when teaching her rein aids. After a few repetitions Joy gets to perform the movement herself at the walk. If she feels ready, we will walk on and halt the horse at clearly marked spots in the arena. This can be an arena letter or a “gate” of tall cones. If needed I can provide hand-over-hand support combined with verbal instructions. As her movement becomes more coordinated, refined and independent, I will start to fade out my instructions.
Are you ready to maximize your riders potential?
I hope that this post can be an inspiration for you to incorporate a multisensory teaching approach into your lessons. If you have any questions or would like to share your experiences, please feel free to contact me via e-mail or through Facebook @estheraufsteigertherapie and Instagram @estheraufsteigertherapie
Resources:
If you are looking for ideas and resources in order to teach your lessons incorporating a multisensory teaching approach you might find these apps and websites helpful:
- Free “Kids Timer” App for Android
- Time Timer App for Apple
- Pictoselector – a great free program that helps you build visual schedules
- “Learning how to teach” my 3 day clinic for Adaptive Riding Instructors
About the Author

My name is Esther Schlegel. I´m an Occupational Therapist from Germany who specialized in the field of Adaptive (Therapeutic) Riding and Hippotherapy. I have gained knowledge and experience by living, studying and working in a variety of countries including Germany, The Netherlands, USA and Canada. In Germany I operate my own Occupational Therapy practice with an emphasis on Hippotherapy and Adaptive (Therapeutic) Riding which I run with lots of heart and competence. Besides treating clients, I enjoy teaching Occupational Therapy students at their college as well as offering clinics and webinars regarding various topics related to Occupational Therapy, Hippotherapy and Adaptive (Therapeutic) Riding. I live in Germany for most of the year but spend my summers in Canada, where I offer clinics and consultation services to Adaptive (Therapeutic) Riding Centers.
If you are seeking a way to expand your knowledge as Adaptive Riding Instructor I would love to invite you to my summer clinics in Dawson Creek, BC, Canada. For more information, please follow the link to my website: https://aufsteiger-therapeutische-konz.jimdo.com/english/clinics/
Travelling doesn´t fit your schedule at this time? Check out my ATR Webinar “In case you´re not a doctor” that you can enjoy from the comfort of your home: https://aufsteiger-therapeutische-konz.jimdo.com/english/atr-webinar/
****************
Note: This is not professional advice, this is a blog. I am not liable for what you do with or how you use this information. The activities explained in this blog may not be fit for every rider, riding instructor, or riding center depending on their current condition and resources. Use your best personal judgement! If you would like to contribute an activity or article, please contact me here, I would love to hear from you!