Learning to feel the horse’s footsteps is a good exercise for all types of riders. I still teach some lessons to able bodied riders and we had fun working on this one yesterday, so I want to share it here. Below is a detailed explanation with some example lesson plans linked at the end – just use the Hows and Whys that best fit your rider’s cognitive and riding abilities. Enjoy!
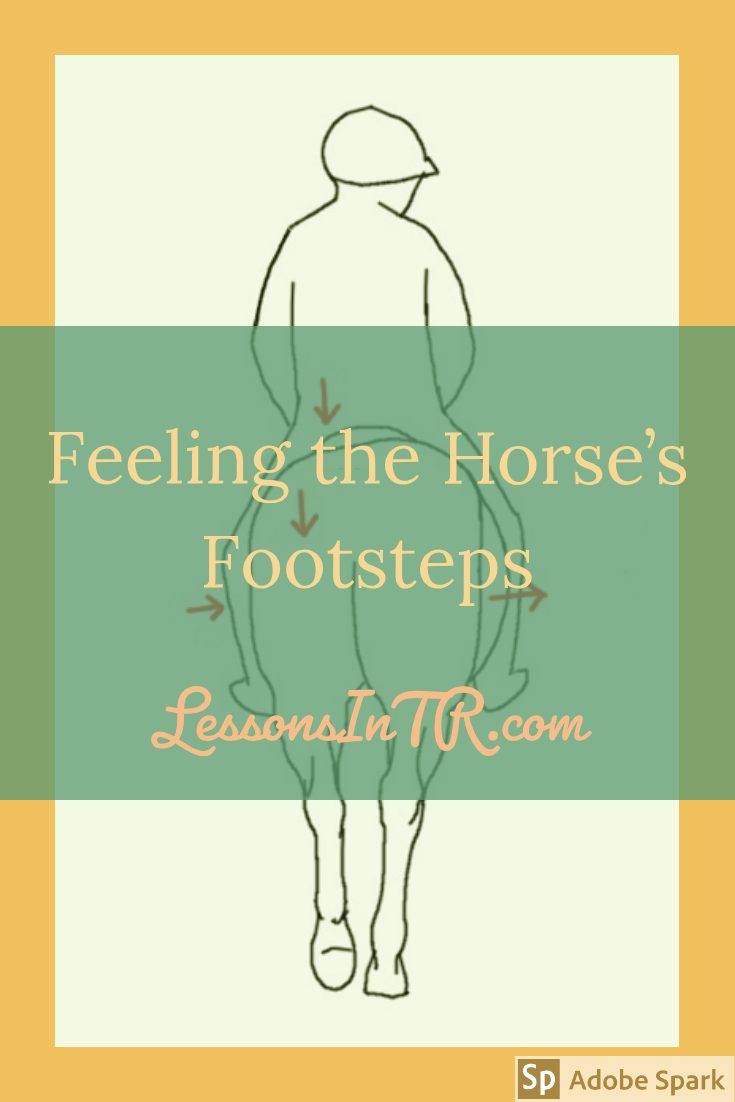
Feeling The Horse’s Footsteps
What
- Feeling the horse’s footsteps is the act of sensing with one’s hips and seat the exact placement of the horse’s hind legs: when each hoof is picked up, set down, and pushing off.
- Note, this is not exactly a “riding skill” in which the rider cues the horse to do something (like turn, bend, halt, etc.), but is rather a “pre-skill” which helps the rider ride and apply the cues better (like balance, posture, etc.)
When
Feeling the horse’s footsteps can be used for…
- new riders to learn how to feel and follow their horse’s motion
- riders of any level who have a hard time following their horse’s motion
- riders that have the basics down, since they’ll use it to apply the aids correctly in the next level of movements such as leg yield and extended walk
- intermediate riders to better control their horse’s hind end
- a refresher at the beginning of the lesson to prepare for teaching a cue that depends on correctly timing the leg aid
- riders with life skill goals to practice things like counting and identifying right or left
- Note, this exercise may be a bit difficult for riders with cognitive disabilities or delayed processing, because the horse’s walking steps go so fast, but I bet you can figure out ways to adapt it.
Why
Feeling the horse’s footsteps is important because…
- It lets the rider can have greater control over their horse’s feet for cueing more advanced movements.
- A horse can only move his leg when it is in the air. So if you want to cue him to extend his walk (make his steps longer) or leg yield (step sideways), you need to ask when his leg is in the air or even better as he is picking it up. (Can a horse move his leg somewhere when it’s on the ground? No! He can only move it when it’s in the air!)
- A horse can only push harder with his leg when it is on the ground. So if you want to cue him to engage and push off the ground more strongly, you need to ask when his leg is on the ground or even better as he is stepping down.
- So instead of just riding along, by feeling the horse’s footsteps and applying the leg aids at the correct time, the rider can control the length of stride the horse has, how many strides the horse takes in a given space, what direction the horse is placing his feet, and so on, giving the rider greater control over the horse.
- It helps the rider move with their horse better (by becoming more aware of the horse’s motion).
- For riders who have difficulty moving with the horse, understanding that the horse’s feet move their own hips may be key to learning to move with the horse.
- For riders who try too hard to move their body with the horse and over exaggerate the movement, waiting to feel the horse’s steps may encourage them to let the horse move their body and not force it.
- It helps the rider develop “feel”.
- “Feel” is often a magical undefined word, but it’s just learning to literally feel what the horse is doing under you – both where his feet and his mind are – at every step, so that you can respond in a sensitive and timely manner, and even predict his movements and take action ahead of time.
- Some riders are more natural at having “feel” than others, but it can definitely be learned through experience, training, and education. And lots of hours in the saddle. And exercises such as feeling the horse’s footsteps!
How
This is the most technical way to teach feeling the footsteps – you can simplify and adapt according to the rider.
- Review
- You may want to teach/review the order of the horse’s footsteps at the walk.
- At the walk, ask the rider to feel the horse’s footsteps move their seat, hips, and legs.
- Tell them to just go with the horse’s body, let his body move yours and let your legs swing side to side with his barrel.
- Explain to the rider what they are feeling.
- When the horse picks up his hind leg and swings it forward, his hip drops on that same side, and his barrel swings to the side out of the way of that lifted leg.
- The rider’s body mimics the horse’s: the rider’s hip drops on the same side the horse’s hip drops while lifting the leg, and as the horse’s barrel swings out the rider’s legs follow.
- Ex) When the horse picks up his hind left leg to take a step, his left hip drops and his barrel swings to the right – SO the rider’s left hip drops too and their legs swing to the right (technically the rider’s left leg moves toward the horse and their right leg swings out)
- Each horse will feel different. Some have a more side to side movement with very obvious hip dropping, others have a more front to back movement, and still others have a rotational figure-8 (side to side and front to back) movement. So you may need to adjust your explanation of what it should feel like to that individual horse.
- Call out for the rider when their horse steps “left, right, left, right”.
- Do this a lap or two, or until the rider seems to feel what you are saying.
- I think about saying it so that, in spite of everyone’s processing time, I’m saying it and they are understanding it at the right moment. That means I say “left” as the horse is just about to lift the left hoof , because by the time it actually gets out of my mouth the foot is already in the air, and it will take a moment or two for the rider to hear me and feel in their body what is happening. So pay attention to whether your verbal cues are timely, so that the rider is not learning to feel something different than you are intending to teach them (such as, learning to feel the horse setting his hoof down instead of the hoof being lifted because you are too late at calling it out).
- Ask the rider how it feels to them.
- Each rider feels the movement differently, so your rider will need to figure out their “tell” – maybe it’s how their hip drops, or they feel the horse push with a leg better than pick it up, or they can’t even explain what they feel they just sense it – it doesn’t matter, as long as they can consistently identify what’s going on.
- Although you the instructor can describe what it will probably feel like, the rider will ultimately have to figure it out themselves as you tell them when the horse is lifting each foot, and they discover what their particular horse feels like and what type of feeling it creates in their body.
- Ask the rider to call out which leg is being used, like you did.
- Depending on the rider, you can do the following…
- HARDER: Go straight to asking them to identify “left, right, left” as you did,
- EASIER: Ask them to first identify when one leg is used (“right, right, right”), and then the other (“left, left, left”), and lastly both (“right, left, right, left”) – breaking it down this way may be easier since they don’t have to say so much so fast and can just concentrate on one side/feeling at a time.
- HARDER: Have them start off calling it out themselves without your help (a progression from the above)
- EASIER: You first call it out and then have them take over: “I’ll start calling it out and then you take over…right, left, right, left, your turn!” This may be easier for them at first than if they had to start it off themselves.
- Note: you may want to start with calling out the inside hind leg, since it is the leg that we most use to influence the horse and therefore the most important one to be aware of.
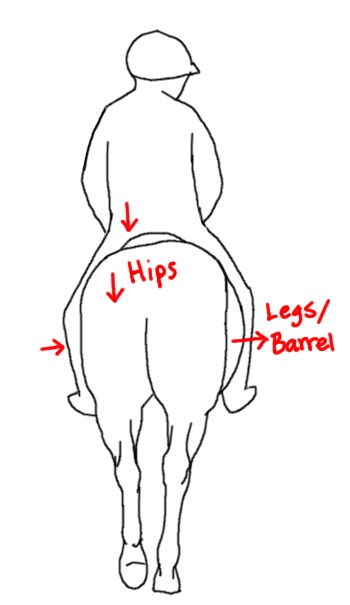
#3 Explain to the rider what they are feeling. As the horse’s hip drops, their same hip drops. As the horse’s barrel swings to the side, so does their legs. It will feel different for every rider and horse, though.
Progression
Once the rider can consistently identify when the horse is lifting each hind leg, it’s time to use this knowledge to apply the aids to ask for something specific! The most common riding skills would be:
- Stride Lengthening/Extending – apply alternating leg aids as the horse lifts each leg to ask him to step further forward with that leg.
- You can even set out two cones or poles and count the strides between them first at a regular walk and then with alternating leg aids (the extended walk) to see if they can fit in less steps.
- Stride Shortening
- As the horse steps forward, you can resist with your seat to ask him to shorten his stride.
- Leg Yield – turn up the quarter line and apply the inside leg aid as the inside hind is lifted, to encourage the horse to move that hoof over when it’s in the air.
- There are obviously more aids involved to the leg yield that I won’t go into here. Note it would be easier/preferable for the rider to be already familiar with the leg yield so you are not having to also teach a whole new skill, but rather can just focus on this one new component of the well timed leg aid.
- Halting Square
- “You can also ask your horse to stop by cueing him to plant his right hind first (right seat bone, right rein), and then his left (left seat bone, left rein) for a more balanced whoa.” (source)
- Counting – ask the rider to count each time they feel the horse step
- count each time they feel each leg – right, left, right, left, 1, 2, 3, 4
- count each time they feel just the right leg – right, right, right, 1, 2, 3, 4
- count how many times they feel the steps down the long or short wall, or between cones or poles
- from the halt count 5 steps then halt again
- Rhythm – ask the rider to count 1-2-1-2 or say da-da-da-da or sing a song to the walking rhythm, to feel if the horse stays in rhythm or speeds up or slows down
Example Lesson Plan
Here is an example lesson plan of a teaching feeling the footsteps based on the above but simplified for this particular rider:
Rider: Able-bodied beginner/intermediate rider who has the basics down and has already learned some leg yield.
- Warm up
- walk halt walk to get the horse listening to the rider’s legs
- ride without stirrups to stretch the rider’s legs and deepen their seat to later feel the horse’s footsteps
- speed up and slow down to get the horse listening to the rider’s legs some more
- Riding Skill Explanation
- What – Feeling the horse’s footsteps is feeling with your hips and seat when the horse picks up his feet…
- Why – …so that you can better time your cues when asking for things like extended walk and leg yield. (Explain about cue timing and the horse only being able to respond when his foot is in the air for those skills)
- How – I’m going to first tell you when the horse is picking up and stepping forward with each leg so you can feel it, then I’ll have you start to identify it yourself.
- Where – Stay riding on the rail, keeping your horse straight, but don’t be worried about rhythm or speed, right now just focus on feeling what he’s doing.
- Practice
- Remind the rider to just go with the horse, let the horse’s body move theirs. It will feel like walking, as his hind legs walk, their hips walk too.
- I’m going to tell you when the horse lifts each leg and you should feel your hip on the same side drop and your legs swing out to the side as he lifts his leg and brings it forward. Ok…right, left, right, left, right, left, (etc. for 1 lap of the arena)
- Ask, Do you feel what I’m telling you? Do you feel him pick up each leg? What does it feel like to you?
- Rider explains it does feel like their hips are dropping to that side, almost scooping. They also feel like they are able to move with their horse better already, and surprising benefit.
- I’m going to have you call out the steps but just starting with the right (inside) hind, to start off easier. I’ll call it out first, and then you can take over. Ok…right, right, right…your turn. (The rider continues, it takes a few tries but quickly gets it).
- Next let’s do the left leg. (repeat the above with left leg)
- Now let’s do both legs. (repeat the above with right leg)
- Now lastly, I want you to walk a bit, then start calling it out on your own, without my help. (The rider does this, again it takes a few tries but eventually gets it).
- Progression
- Now we will apply this to stride lengthening. So far you have worked on speed up and slow down, which is when we ask the horse to hurry up their steps like this (demonstrate with your own legs) and slow down their steps (demonstrate). You’ve been doing this by squeezing with both legs. However, you can also ask your horse to extend their walk, which means to take longer strides, like this (demonstrate). You do this by squeezing with one leg on the side the horse is picking up their leg, because when it’s in the air they can step it further forward. So when your left hip drops, squeeze with your leg leg, and when you right hip drops, squeeze with your right leg – so it will be alternating leg aids.
- Practice this down the long walls.
- If time, practice between two cones and count the strides in between, first at a regular walk, then at an extended walk.
More Example Lesson Plans
From this blog, incorporating feeling the footsteps:
Stride Lengthening At The Walk
Lengthening and Shortening Lesson Plan
For a great article with even more detail about feeling the horse’s footsteps, check out this Equisearch read.
Enjoy!
****************
Note: This is not professional advice, this is a blog. I am not liable for what you do with or how you use this information. The activities explained in this blog may not be fit for every rider, riding instructor, or riding center depending on their current condition and resources. Use your best personal judgement! If you would like to contribute an activity or article, please contact me here, I would love to hear from you!
Awesome, thank you…. hope all good at your end too.🐴😊
Thanks Nan! Everything is good, life is full and busy with two littles!
Thank you. What an excellent article. Really enjoyed reading it and will definitely be trying out out with my riders.
Excellent plan! Thank you so much. I am in training for Path and will post some of my plans as I get used to the format.
Thank you! Good luck on your training and I’d love for you to send in some of your plans to share!