I had a riding lesson today (for the first time in a long time…hello continued education deadline) and we did a good little exercise I want to share. I told my instructor that because both my mare and I are out of shape, I want to start with a review of the basics (change of rein/bend, shoulders in, haunches in, etc.). So she gave me this series of steps toward improving our change of bend. I think it’s simple enough that you could do it with some of your more intermediate/advanced riders, and it’s a good example of breaking a movement down into many steps in order to learn it and prepare your horse to do it well (task analysis).
Change of Bend Exercise
Setup:
- 2 cones on the long center line at X
Exercise:
The end goal is to use the aids to change the horse’s direction and bend while staying smooth, balanced, and in a consistent rhythm. You will start with circling one direction,
- Establish a 20 meter circle on half the arena, going between the two cones at x (riding half a figure 8…the whole thing will come later). Establish rhythm and bend.
- Prepare #1: Halt. Halt between the cones, then continue in same direction. Use your seat and light rein to prepare horse before the halt. Breathe out when asking for the halt and release your leg. Work on making it smooth. When asking the horse to walk on, breathe in and lift your chest/ribs. Once you do this well in one direction, do it in the other direction. Halting gets you and the horse thinking “slow down, something’s coming up” between the cones, and gets your horse listening to the seat and hand aids that are a bit “louder” for halting before being asked to listen to them a bit “softer” for slowing down. This is like a pre-exercise to the actual exercise.
- Prepare #2: Slow down. Next slow down but don’t halt between cones. Use your seat to maintain the walk (“walk with your seat bones”) or trot but slow it down to slow the horse down. Half halts may be needed. Then do it the other way. Work on keeping a consistent rhythm. Slowing down also gets you and the horse thinking “slow down, something’s coming up” to prepare for the change of bend.
- Add: Straighten with a leg yield. Next slow down and straighten by adding a slight leg yield. When you come off the wall toward the cones, half halt a few times to prepare the horse, then add the outside leg and rein and hip/seat to ask the horse to step over toward the inside cone, not in a huge leg yield, but he should straighten and step under with his outside leg, in order to prepare him for changing directions. Then continue on the same direction. So if you are going in a circle to the left, as you leave the wall curving left toward the center cones, you ride “Half halt, half halt, right leg, right leg, carry on”. Adding the straightening prepares your horse for the change of bend, so you can do it slowly and in balance, instead of surprising your horse which can throw him off balance causing head tossing, hollowing, falling on a shoulder, etc.
- Add: Change directions. Do the same but change directions as you figure 8 between the cones. So you ride “Half halt, halt halt, right leg, right leg, straighten, change bend, carry on the other way”. This puts it all together: preparing the horse, straightening the horse, then changing the bend.
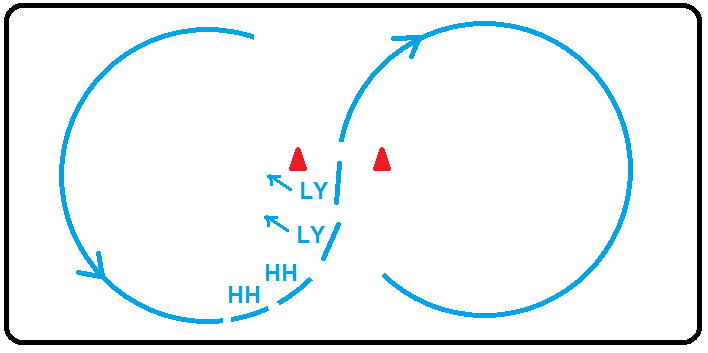
LY = leg yield
Notes:
- With intermediate riders you can go straight to doing this at the trot, but with unfit riders or those with disabilities you can keep it at a walk. The trot definitely requires faster processing time and higher riding skill.
- The instructor has to give a LOT of cues fast from the wall to the cones, so be clear and consistent. If the rider is having trouble following the instructions while doing the exercise, stop to have the rider imagine it in their head first without trying to process while worrying about the horse underneath them – even put their body in the right positions. (I had trouble keeping her instructions about leg and right leg/hand straight!)
- When trotting, change the posting diagonal when it works best for the pair – in the middle might be too confusing, I found that after the change of bend was better for me, or you could do before the cones to tell the horse heads up something’s coming.
I hope you enjoy it as much as I did!
****************
Note: This is not professional advice, this is a blog. I am not liable for what you do with or how you use this information. The activities explained in this blog may not be fit for every rider, riding instructor, or riding center depending on their current condition and resources. Use your best personal judgement! If you would like to contribute an activity or article, please contact me here, I would love to hear from you!
Thank you for your time to write this up. Everything you write is so detailed and helpful!