I really like teaching extending and shortening the walk. I like to teach it soon after the basics (how to balance, halt, walk on, and steer your horse) because I think it gives beginners a needed sense of more minute control of their horse and a feel for what is a normal speed for their horse. It also offers an easy introduction to some important riding concepts such as using one leg at a time and timing the aids to when the horse is picking up their feet.
I have already blogged about this concept two other times (see Lengthening and Shortening the Walk Lesson Plan and Slow Down and Speed Up Lesson Plan) but every time I learn something new, so here we go again! This is how I taught it the past week – first the explanation of the skill, then 3 different lesson plans and what I learned.
Extend and Shorten the Walk
Whats, Whys, and Hows
Extendeded Walk
- What
- Your horse takes longer steps and covers more ground. It feels like you are going faster, but he actually steps at the same speed just with longer steps.
- Why
- To help you gain more control of your horse
- To use if your horse is going too slow, it helps him wake up or catch up to rest of the class ahead of him
- To use if your horse is distracted and wandering, it helps him pay attention and walk straighter
- How
- Seat – Feel how your hips follow his walk? Increase your seat movement, not so big I see you dancing, but just a little, as though he is already taking bigger steps. He will feel your seat and try to match it.
- Reins – Put your hands forward a little to let the reins loosen, so you are not holding him back or accidentally asking him to slow or halt. This also lets him drop his head and stretch his neck forward, which helps him take bigger steps.
- Legs – Alternate leg aids, just a little squeeze. Feel how your hips take turns dropping as he walks? Your hip drops as he picks up that hind leg into the air to step forward. This is the best time to ask him to step farther forward, because he can actually do it! He can’t move his foot farther when it’s already on the ground. So when your hip drops, squeeze with your leg on that same side. Your leg is naturally swinging under you, so increase that movement a little more with a squeeze.
- Voice – Cluck in time with his walk. For riders without use of their legs, this can be a good alternative. They can cluck when their hip drops, timed to the hind legs, or I had one rider cluck when the horse lifted his head to pick up his foreleg.
Shortened Walk
- What
- Ask your horse to shorten their steps. I will feel like you’re going slower, but actually they are taking shorter steps at the same speed.
- Why
- To help you gain more control of your horse
- To ask a horse that feels like it’s going too fast to pay attention and slow down
- To help a horse navigate tricky obstacles, because the more tiny steps he takes, the more you can make little adjustments to control where he goes and puts his feet
- How
- Seat – Slow your seat movement. Pretend your horse is already walking slow and ride that way, and he will try to match you. If this doesn’t work, you might need to pretend like you’re asking him to stop by sitting deep and stopping your hips from moving for a second.
- Legs – Legs are still. You may need to take your legs physically away from your horse. However, if he slows down too much or stops, you may need to use your legs to ask him to keep walking!
- Reins – See how your horse bobs his head as he walks? Can you feel that in the reins? Your hands should follow that bob. When his head comes up, he is stepping forward with one of his front legs, and this is the best time to ask him to shorten that step, because with his leg in the air he actually can. So when his head comes up and your hands naturally come back, increase that motion a bit more by squeezing the reins with your fingers, and if that doesn’t work then bringing the reins toward your belly, then let them return forward again as he bobs his head down. (Note: I liked teaching timing the reins to the front legs because it gave them both a visual and a feeling. However you can also teach it timing the reins to the hind legs, applying the aid when the hind leg steps forward and your hip drops.
- Voice – Say “easy” in a calm low voice. (Note: for some riders this gives an added sense of control, and it lets the leader know when the rider is applying the aids and wants the horse to slow down, so they can help.)
Note:
- Exactly which aids you teach, and how detailed, depends on the rider.
Sample Lesson Plan 1
Rider 1 : A veteran who is able bodied and fully cognitive.
- Warm ups
- Lots of laps just warming up his achy body and getting him centered, since he tends to sit off to the left and lean to the right.
- Warmups for the horse – brakes, gas, steering – to review the aids and make sure the horse is listening
- Teach shortening the Walk.
- I taught this first because his horse, once she goes fast, wants to keep going fast, so this established control for future encounters of the fast kind
- What, How, Why – see above. We we went over everything in detail because he loves to learn as much as possible and can usually apply it all in his body.
- Practice on the rail a few times
- Activity
- Set up 2 ground poles 10-12 feet apart.
- First ride a regular walk between the poles. Ask the rider to count the number of steps between the poles.
- Then ride the shortened walk between the poles and count the number of steps. Ask if there should be more or less steps. There should be more. Repeat until there are more steps taken.
- Teach Extending the Walk
- Same as above
- Activity
- Same as above, but this time ask if there should be less or more steps between the poles than the regular walk. There should be less, because the horse takes longer steps. Repeat until there are less steps taken.
- Cool Down
Note:
- Even though this rider performed the activity correctly and was able to get more and less steps between the poles, the next week he said he didn’t get it, that it didn’t click. So I left out the poles and the counting and we practiced on the rail so he could FEEL the difference in the strides – and it finally clicked. Both he and I think the counting distracted him from noticing his application of the aids and the response of the horse. So I dropped that approach, I think it’s a lot while learning a new skill! With other riders I started counting for them so they could focus on the aids and feel, or didn’t include counting at all.
Sample Lesson Plan 2
Rider 2: A 7 year old with no use of their legs who is fully cognitive and extremely sharp, with delayed physical movements, and tenses up when thrown off balance.
- Warm ups
- High 5’s to get comfortable letting go of the saddle with one hand
- Airplane arms to get comfortable letting go with both hands
- Mane/tail stretches to find balance
- Skill
- What, How, Why – See above. Because she has no use of her legs, I taught voice and rein aids with close focus on the timing, which she enjoying the challenge of achieveing.
- Practice
- On the rail a few times
- Activity
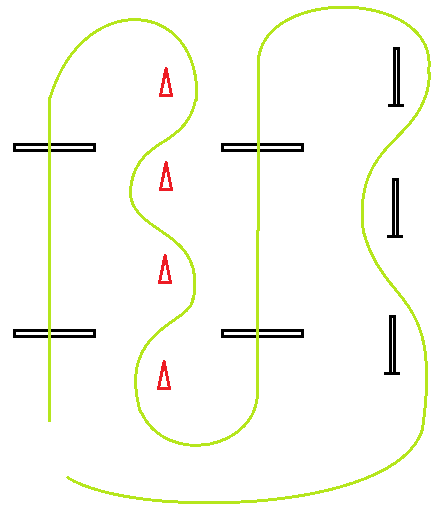
- Obstacle course: Over the poles, weave the cones, over the second set of poles, weave the upright poles.
- We are also working on steering and her using one hand at a time, and putting both hands forward to finish the turn, and balancing on her own instead of using the reins, so I alternated speed control and steering.

- Round 1: regular walk, count the strides
- Round 2: extended walk, count for less strides
- Round 3: shortened walk, count for more strides
- Note: After she had a hard time counting the strides and focusing on the aids, I designated a volunteer to count the strides for us.
- Cool Down
Sample Lesson Plan 3
Rider 3: Rider is an adult, able bodied with cognitive delays and focusing issues.
- Warm ups
- Hands on helmet
- Windmills (alternating arm circles)
- 2 point
- Warmups for the horse – brakes, gas, steering – to review the aids and make sure the horse is listening
- Skill
- First taught extend the walk. Because her horse is especially sensitive to leg aids, we focused on the seat and rein aids and had her legs off the horse most of the time.
- What, How, Why – see above.
- Practice
- On the rail a few times
- Activity
- Same setup as above for Rider #2 but without the last weaving poles.
- Obstacle course: 2 point over the first 2 poles, weave the cones, extend the walk over the second two poles. I chose to work on 2 point over the first two poles because we are also really work on keeping her feet under her body and off her horse.
- Attempt 5 times, until successful.
- Did not continue on to teach shortened walk, since she had more difficulty with the pattern than expected.
- Cool Down
Note:
- Interestingly, it really caused problems for this rider to have two difference exercises over obstacles that looked the same – 2 point over the first two poles, then extended walk over the second set. Even though she could perform the skills very well, remembering which skill to do when was very difficult. She kept wanting to do 2 point over the second set of poles, and when she finally extended the walk, wanted to do it over all sets of poles. So we mostly worked on just remembering the correct pattern. I thought this was a great unexpected exercise in focus and memory, having two obstacles that looked the same but were for different skills!
That’s all! I thought it was such an interesting week with all the different experiences teaching this one skill. Do you have any thoughts to add?
****************
Note: This is not professional advice, this is a blog. I am not liable for what you do with or how you use this information. The activities explained in this blog may not be fit for every rider, riding instructor, or riding center depending on their current condition and resources. Use your best personal judgment!