Last weekend I went to the Midwest Horse Fair and had the pleasure of seeing a few seminars by Stacy Westfall! In one seminar called something like “Improve Steering Control” she used the cloverleaf pattern to demonstrate how to teach a horse the inside and outside reins, and with her demo riders used the pattern to teach the rider better control of her own hands when using the inside and outside reins. After trying it out on my horse, I like it enough to share it with you! As usual, I have gone into probably too much detail. It depends on your rider how much explanation you will use. Enjoy!
The Cloverleaf Pattern
This is what the cloverleaf pattern looks like and how it’s rode, thanks to this cute video I can’t get over. This woman uses the pattern to teach leg yielding to her horses, which is another idea for how to use it in lessons. However my post is about inside and outside rein.
(If you can’t see the video click here: https://www.youtube.com/watch?v=RptQ0SlCvoY)
Set up
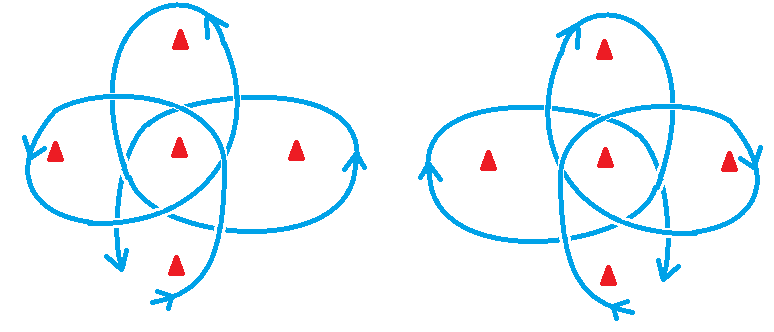
- 5 cones in a cloverleaf pattern – one in the middle, the rest form a box around it, not too close or the turns are too narrow and hard
- Consider using numbered cones to help the rider look up to and spot the next cone to go around. There are these tennis court cones or these Stacy Westfall cones which I hear pop right back out if stepped on.
- This is the cone setup and the pattern going each direction:
Activity
(Note the activities can be started at the walk or trot depending on the rider).
Inside Rein on the Cloverleaf
- Explain the inside rein.
- The inside rein directs the horse’s inside shoulder.
- Use the inside rein to direct the horse by squeezing softly, and if needed, bring it back toward your pocket. You may need to bring the rein back farther for a sharper turn, or less for a shallower turn.
- Do not cross the hand over the mane or their neck will bend too much.
- If the horse needs more guidance, use an “open rein” away from the neck to make the request more obvious.
- Be subtle and use small adjustments, giving the horse time to respond.
- Remember to look the direction you want the horse to go, as this causes a weight aid and helps direct him.
- Explain the exercise
- You will use only the inside rein to steer your horse through the cloverleaf pattern. Try to make the turns around the cone big and even throughout, staying the same distance from each cone every time.
- Plant the outside hand on the saddle to keep it from doing anything. This prevents the outside hand from being unstable, used to help us keep our balance, used to influence the circle, or interfering with the horse’s understanding of the inside rein aid.
- Practice the exercise
- First just ride the pattern to get it down. It helps to remember to always keep the cones on the same side of your body, and just keep turning in the same direction.
- Notice where the pattern is uneven – some turns will be made too wide or cut off too narrow.
- To fix this, don’t neck rein to push the horse further out on the turn, which stiffens the shoulder. Instead, cut off the too-wide turns, then add gas on the cut-off-narrow sides. Adding speed helps the horse straighten and go farther out on the turn, while opening his step outward like a spiral out, instead of stiffening.
- Practice until the loops are even.
- Progress the exercise
- Spiral out to make the loops larger.
- Spiral in to make the loops smaller.
Outside Rein on the Cloverleaf
- Explain the outside rein
- The outside rein directs the horse’s outside shoulder.
- Use the outside rein to direct the horse by keeping gentle, even contact (while the inside rein sets the bend). Bring it away from the neck in an “open rein” to ask him to move out on the circle, or bring it toward the neck in an “indirect rein” to ask him to move in on the circle and make it smaller.
- Do not cross the hand over the mane or their neck, as it will confuse the horse.
- Be subtle and use small adjustments, giving the horse time to respond.
- Remember to look the direction you want the horse to go, as this causes a weight aid and helps direct him.
- Explain the exercise
- You will use only the outside rein to steer your horse through the cloverleaf pattern. Try to make the turns around the cone big and even throughout, staying the same distance from each cone every time.
- Plant the inside hand on your thigh to set the bend. You can hold on to your pant leg if needed. This way only the outside rein is being used to control the shoulder. (Once the horse realizes the inside rein is anchored, he should keep the bend and start paying attention to the outside rein more – or in the case of training, start to try ti figure out what the outside rein means).
- Practice the exercise
- Same as above, but this time use the outside rein to control the side of the circle.
- Progress the exercise
- Same as above.
Inside and Outside Rein on the Cloverleaf
Once the rider has used the above exercises to separate their rein aids, they can start putting them together by using both reins aids on the cloverleaf pattern. Hopefully by now they are much better with their hands, and by combining the two aids they can be very subtle with their rein aids to guide the horse through the pattern.
Preparatory Exercise
For some riders you should first practice around 1 cone before throwing 4 at them, because learning to ride a somewhat even circle is probably a prerequisite to riding a cloverleaf pattern, and it’s easier to focus on circling 1 cone than a pattern in order to learn the aid correctly!
Inside and Outside Rein Around a Cone
- Explain the inside rein.
- Ride a circle around the cone using only the inside rein, in the same way as explained above.
- Practice until they are able to keep the circle even. (this may take minutes, days, or months)
- Progress to spiral in and spiral out to expand their use of the inside rein.
- Practice until they can do this smoothly with a soft hand.
- Repeat with only the outside rein.
Benefits of These Exercises
- Rider learns to use the hands separately
- Rider learns to use each rein aid separately
- Rider must concentrate and plan ahead to stay on pattern
- Rider uses sequencing and memory to stay on pattern
- Helps the rider focus
- Horse learns to respond to each rein separately, giving you more control when you put the two together
- Horse learns rhythm and cadence because all the turns are in the same direction
- Horse training precursor to neck reining
And lastly…
REMEMBER TO TAKE BREAKS OFTEN! This exercise can get repetitive for the horse, and dizzying for the rider. Take a break, go walk somewhere, then come back to it!
Have fun!
****************
Note: This is not professional advice, this is a blog. I am not liable for what you do with or how you use this information. The activities explained in this blog may not be fit for every rider, riding instructor, or riding center depending on their current condition and resources. Use your best personal judgment!
Only thing missing in your article; What distance are the cones set up at?
Good question. I do not remember the measurements the clinician used. I typically do not share measurements on this blog because with therapeutic riding the distance and bend each rider can handle based on their abilities and disabilities is different, so the instructor needs to make that decision for their own rider. I usually do it by eye based on what I know my rider needs.
Thank you for your reply. After some riding and testing myself, I have figured out the “standard” being 20ft between the outter cones with one in the center. This distance allows advance riders and horses to lope/canter the pattern while novice and beginners can easily jog/trot. Great pattern to work on inside and outside bends as well.
Thank you so much for sharing the good distancing you’ve figured out! I’m sure it will be very helpful to readers 🙂