An instructor at our barn set up the diamond pattern yesterday and this is what I did with it!
Lesson Plan for Outside Rein Aid using the Diamond Pattern
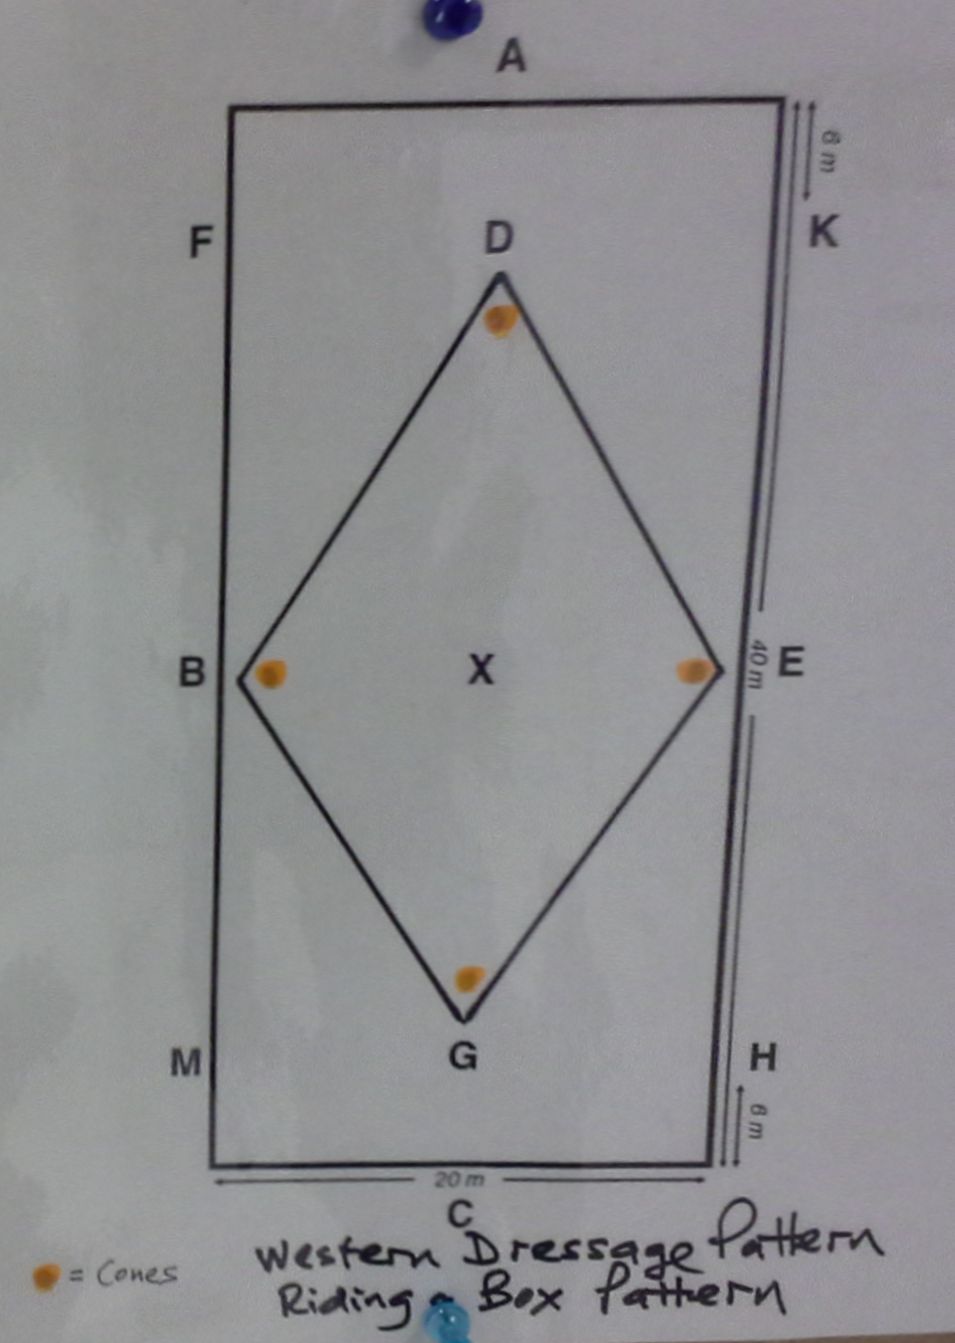
Arena Setup:
- 4 cones or poles set in diamond shape
Lesson Plan
- Safety Check
- Mount
- Safety Check
- Warm ups
- Lower body: ride no stirrups 1 lap
- Upper body: backward arms circles 10x
- Wrist circles 10x
- Reverse, repeat opposite direction, ask them to remember what they did first, second, third
- Riding Skill
- What: Outside rein aid
- Why: The outside rein controls his shoulder and helps bring it around the turn (instead of popping his shoulder out and continuing to go forward); therefore it controls the size of the turn and the perimeter of the circle, maintaining the horse’s shape around the inside leg aid
- How: Keep contact throughout the turn, and bring the hand in so the rein touches the horse’s neck; keep your elbow at your side. (Do not let it cross the neck, or it will bend the horse the other way; do not bicycle the reins, pushing the outside rein forward while the inside one comes back). Also include any other aids you’ve learned – inside direct rein to tell the horse to bend, eyes looking where you’re going, turn the upper body slightly the direction of the turn, weight the inside seat bone slightly.
- Where: First practice around the cones, then in a pattern.
- Safety Check
- Practice
- Steer around a cone to the left, using only the direct rein.
- Steer around a cone to the left, now using the direct and outside rein. Repeat until rider uses the outside rein aid correctly and feels the desired affect on the horse.
- Discuss the difference between using just the direct rein, and adding the outside rein. Ask if they can feel the difference.
- Repeat the other direction, around a cone to the right.
- Pattern
- Explain the Diamond pattern. Use a picture, or have a volunteer walk the pattern for them. They may need to follow a volunteer around the pattern once.
- Remind them that the turns will alternate between sharp and wide. Sharp turns will need stronger aids, and wide turns will need more subtle aids.
- Practice 3x each direction. End on a good turn.
- Progression
- Attempt at the trot, if able.
- Wrap up
- Dismount
This is a great pattern because it alternates sharp and subtle turns! It’s a good one to use for steering in general because you must keep switching between the two.
Enjoy!
****************
Note: This is not professional advice, this is a blog. I am not liable for what you do with or how you use this information. The activities explained in this blog may not be fit for every rider, riding instructor, or riding center depending on their current condition and resources. Use your best personal judgment!