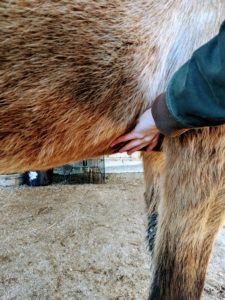
What do you guys do to keep your adaptive or therapeutic riding horses comfortable for winter lessons? The other cold day I was grooming my horse in gloves, which I took off to check with my bare hands that her girth area was free from mud. I was surprised to find that, as well as I thought I had curried the girth area, there were still little dried mud bits that I had not felt through the gloves or brush. It made me wonder how many of our program horses have gone through a day of lessons with mud bits stuck between their girth and skin because a volunteer may not know or think to check without gloves, especially if they are in a rush. I wondered how many other simple things there are that we can do to ensure our horses are comfortable in the winter. So I researched a little and asked around on Facebook a little and came up with this post about keeping your adaptive or therapeutic riding horses comfortable before, during, and after their winter lessons. Enjoy!
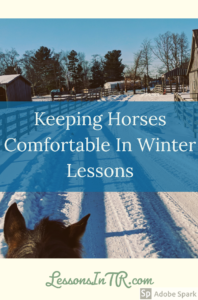
Keeping Horses Comfortable for Winter Lessons
Bring Horses In Early
Bring your lesson horses in earlier than usual before their lessons to help them warm up in their stalls and feel more positive about their work coming up. One source said 1 hour before a lesson and a few hours if it’s freezing. You know what’s best for your horses regarding the trade-off of warmth inside v.s. movement outside. If your horses don’t have a windbreak outside you may need to bring them in earlier if they get chillier.
Hay and water
Once inside, feed the horses hay and water. Hay equals digestion equals warmth. The NDSU Agriculture Communication says: “Heat is produced through the digestion of feed and can be useful in helping a horse maintain body temperature in cold winter weather. The greatest amount of heat is released when microbes in the gut digest high-fiber feeds such as hay.” (source)
Give them free access to unfrozen water, preferably warm. The article Winter Feeding for Horses by the Rutgers Equine Science Center says, “The risk of impaction colic is dramatically increased by inadequate water intake, reduced physical activity and lower quality forage intake, all of which can be present in cold winter months. Horses will not drink as much ice-cold water as they will if the water is ice free and at least 40ºF.” Check the water several times a day to make sure it doesn’t freeze, unless you use electric bucket heaters, which should be closely supervised.
Make sure that the horses’ outside water supply is easily accessible – close to their shelter and not way across the other side of the area where it is difficult to travel in winter conditions. I like it when a water tank is right next to the gate because the horses will usually stop to drink when I bring them in.
Warming Blanket and Boots
When you bring your lesson horses in early, consider putting on a type of warming blanket and boots. We all know from experience that cold muscles don’t work as well as warm ones. Warming the horse’s back and legs helps prepare the horse for exercise, increase mobility, prevent injury and improve recovery.
Several people on Facebook mentioned that they love the Back on Track brand, which uses special technology in their material that “reflects your horse’s own body energy back to them and delivers a therapeutic far infrared [thermal] effect. This effect may increase blood circulation, helping your horse’s muscles recover, stay loose, and become less inflamed. In the warmer months, the Mesh Sheet may also be used 30-45 minutes before exercise to help loosen your horse’s muscles.” The quick wraps use the same technology for the legs, and the boots help stimulated blood circulation in the legs.
Warm Up Bits
Bits can get reeeeally cold and uncomfortable for the horses in the winter. Do them a favor and warm them up before bridling! Here are some ideas:
- The old traditional way: wear the bridle under your jacket (or at least the section with the bit). It may help to drape the bridle over your neck so it stays put.
- Hold the bit in your hands – you can have the students do this while they wait.
- Put the bit in a bucket of warm water (then let the horse drink the water too!).
- Put the bit under warm running water.
- Wrap the bit with a microwave rice warmer. If you have crafty volunteers, ask them to take some special rice bit warmers – see this DIY bit warmer tutorial or this easier one. Or buy a Bit Warmer, Bitten Bit Warmer, handmade off Esty, or there used to be a neat electric BitBlanket but I’m not sure they make them anymore, however you could get the $$$$ cordless Heated Horse Bit Warmer.
- Put the bit in front of a heater. (Note that the bit can get too hot and burn the horse, so be careful).
- Hair dryer (also great for warming volunteer fingers).
- Crockpock filled with water, turned on low for the day, to soak bits in.
- A warm room. Heated tack rooms are nice. Also could be the warm office. One instructor says she takes all the bridles for that day into the office when she arrives. For just my horse, I keep my bridle in the car in the winter so by the time I get to the barn it’s warmed up. Warm rooms are great because the whole bridle gets warm, leather and all, not just the bit.
- Charlie’s DIY bit warmer – once a volunteer I worked with made a bit warmer of his own idea, it was a light bulb in a tin can with some holes on top, mounted on the wall, when you plugged it in the light bulb turned on and heated up the tin can and inside it, letting some heat out the holes, and we placed the bit on top of the tin can to heat it up. It didn’t work as fast as we’d imagined and it only fit one or two bits at a time, and we ended up putting a washcloth over the bit to contain the heat which worked better but made me nervous about having cloth near heat (my little California heart thinks everything could cause a fire), but I think it’s a good idea that could work with some tweaking, so I wanted to share it.
This makes me think about warming up saddle pads, too. I did not find anything about this, perhaps they warm up pretty quickly if the horse’s back is warm, but I imagine heating them up somehow would also make getting ready for lessons more comfortable for your lesson horses. The benefits of having a heated tack room!
Hand Check the Girth Area for Mud
Mud in the girth area is more common in the winter months, and it’s often harder and clingier than usual when it’s basically frozen. As mentioned earlier, even the best curry job can leave behind little bits that the gloved hand cannot feel, so Public Service Announcement your volunteers to use an un-gloved hand to check the girth area for mud!
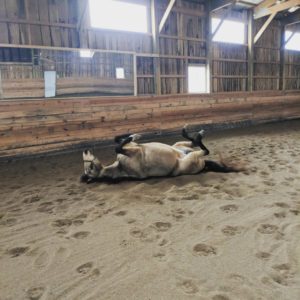
Pre-Ride Movement
Let your lesson horses move around in some way before the lesson. “Warming up and stretching cold muscles prior to exercise is important for getting the circulation going and loosening up stiff muscles and joints. These actions are critical for the prevention of injury and the enhancement of performance throughout the year, but especially so with the onset of frosty temperatures” (King). If the outdoor pastures are so frozen or muddy that the horses don’t run around much, or if the horses have not been turned out because of weather, letting them move around pre-lesson can be necessary to let them relieve their excess energy. Make sure they get out all their kicks and farts out!
The most common ways to give horses movement include:
- Free lunging – let a horse (or few) run in the arena together when they first come in. If you can find a way to do this when the riders are there, they will love watching!
- Lunging – an easy slow lunging is a common way to loosen muscles and get out their energy
- Hand walk – have volunteers bring the horses in to the arena before each lesson extra early to hand walk the horses at different gaits, and keep the horses walking all the way up to when the rider mounts (this also serves to warm up the volunteers!)
Keep in mind that horses that have been standing in a stall all day or night usually need a longer warm up to get moving comfortable again, versus horses that are turned out and have already been moving around.
(Every volunteer wants more to clean off, right?)
Quarter Sheets In Lessons
If the horse and rider are ok with it, you can use a quarter sheet in the lesson to keep the horse warm. One Facebook response said: “Depending on the type you get, they can be pulled over riders legs. I typically tuck them under the leg so it is not attached to the rider and just over the horse’s rump so it’s not attached to horse. Make sure the horse is desensitized to it and the potential of it falling off. You also may not be able to see the riders leg so I only use it for riders with physicals whose legs aren’t going to move much or advanced riders that I know have a solid leg position.”
Slow Down
The general sentiment from everything I heard and read is that in the winter you want to slow everything down! Bring your horse in early, take more time to warm up the horse, take more time for warm ups in lessons for horse and rider, do slower work in lessons such as more walking so the horse doesn’t sweat as much, and take more time for the cool down to give the horse time to dry off.
Limit Work
In colder temps you may want to limit the amount of work your lesson horses do, to prevent sweating, which means a longer cool down time. Limit trot and canter work, consider making lessons walk-only, and only trot if you’re prepared to have someone cool the horse off (and someone to supervise it).
Set A Temperature Limit for Riding
Many barn have a cut off temperature for riding – if it’s any colder than X degrees they do not ride.
Each barn’s cut off temperature will be different depending on where they are located and their circumstances. Factors include:
- Actual temperature
- Wind chill factor (if your arena is outdoors)
- “Real feel” temperature as given by some weather reports (takes into account temp, wind, humidity, sun intensity, cloudiness, precipitation, elevation, etc.)
- Arena (indoor vs outdoor, wind impact, with or without heaters)
- Local weather advisories
- School cancellations (as they follow road conditions – some programs cancel if schools cancel)
- What your riders can handle (with their particular disabilities – the point of lessons is to be beneficial and at some point it does get too cold to achieve to benefits)
- Horses (ex: if they are not turned out due to poor weather and cannot be exercised, there may be a safety issue)
- Time of day (some programs cancel lessons for the coldest parts of the day like evenings, we just ended evening lessons earlier all winter)
The common cut-off temperature that I have seen for Midwest programs seems to be 20 degrees F or below.
Side note: it seems that most temperature limits are set for riders first, who have a hard time keeping warm when work is limited to walking and minimal trotting, while horses stay comfortable to much lower temps. There are people at my barn who ride in lower than 20 degree temperatures, but I would not put a rider with certain disabilities on a horse at that temperature because I do not think their body and muscles can stay warm enough at just walking and minimal trotting, nor can the volunteers stay warm enough to keep them safe – or in order to stay warm enough both rider and volunteers would have to wear so much clothing it would make things unsafe.
Offer Alternatives to Mounted Lessons
If it’s too cold to ride, offer other options, such as unmounted lessons or riding an Equicizer or practice horse. Here are some resources for unmounted lessons:
- What to Teach – Horsemanship and Groundwork Skills
- “Ground School Curriculum” by EAAT Curriculums
- The RIDES program (mounted and unmounted curriculum)
- GallopNYC’s resource for Rainy Day Activities & Groundwork Lesson Plans
- Unmounted Horsemanship Activity Ideas
- Groundwork Activities for Grooming, Tacking and Leading
Dry Off Completely Before Turnout
Don’t forget about keeping your lesson horses comfortable after the lesson!
- Walk the horse until its respiration rate is normal and its skin is dry (although their hair might still be wet). Clipped horses cool down faster so many people use a quarter sheet at this point. This can be part of the cool down or after the lesson.
- Take tack off and put on a breathable wool or polar fleece cooler to wick moisture away and let the hair dry off without giving the horse a chill, then hand walk until the hair is completely dry. A cooler on a clipped horse will keep him warm until he re-acclimates to the cool temperatures, and a cooler on an unclipped horse will help him dry off.
- Speed the process by rubbing the horse with towels, which also offers a nice massage. You can also curry the horse to fluff up his wet hair.
- Keep the horse in a warm area until he is dry. You may be able to remove the cooler and put him in the sun if it is not windy or too cold.
- Do not put a blanket on the horse until it is completely dry. Putting wet hair under a blanket traps the moisture and makes the horse cold.
Thank you everyone who contributed to this post! I was able to share more ideas I originally had on my own!
Do you have anything else to add about how to keep your adaptive and therapeutic riding horses comfortable during winter lessons?
Sources
- King, Marcia. “Winter Workouts.” The Horse. https://thehorse.com/123652/winter-workouts/
- Moore, Debbie. “Warm Up to Winter Riding.” I’https://horseandrider.com/training/warm-up-to-winter-riding-13010
- Responses to my post on the LessonsInTR Facebook page
- Responses to my post on the PATH Intl. Equine Manager Facebook page
- Responses to my post on the Adaptive (Therapeutic) Riding Instructors Facebook page
- Hammer, Carrie. NDSU Agriculture Communication. Keep Your Horse Warm This Winter.
- Rutgers Equine Science Center. Winter Feeding for Horses
- HorseJournals. How to Cool Out a Hot Horse in Winter.
- Pro Equine Grooms. Cooling Out A Horse In Colder Weather.
****************
Note: This is not professional advice, this is a blog. I am not liable for what you do with or how you use this information. The activities explained in this blog may not be fit for every rider, riding instructor, or riding center depending on their current condition and resources. Use your best personal judgement! If you would like to contribute an activity or article, please contact me here, I would love to hear from you!
All very useful information… thank you! Happy Horsing, always!🐴